How to Use OpenClaw Runtime to Create an Agent Operating System
Introduction
OpenClaw is an open-source AI agent platform. You can create multiple agents, connect to multiple messaging systems, connect different tools, MCPs etc… It comes with a lot of built-in plugins and tools that lets agents do the stuff.
OpenClaw has multiple components:
- Web UI. This is the user chat interface layer. A person reads and sends messages here. OpenClaw supports many messaging clients such as Slack and Telegram. Each of these clients connect to the same Gateway the same way the Web UI does.
- Gateway. This is the control plane. It connects many clients — apps, nodes, and messaging services. It owns every client connection and every messaging surface. Every client/app talks to the Gateway server via WebSocket communication protocol. Openclaw have defined strongly typed messaging protocol on top of WebSockets which allows seamless communication.
- Agent Runtime. This component calls AI model endpoints. It also calls tools, manages context, and manages and stores sessions.
- Messaging Systems Openclaw has messaging adapters for wide range of messaging systems. These adapters are responsible for managing connections to those messaging systems, receiving the messages from the user, delegating them to runtime and sending the response back to the user.
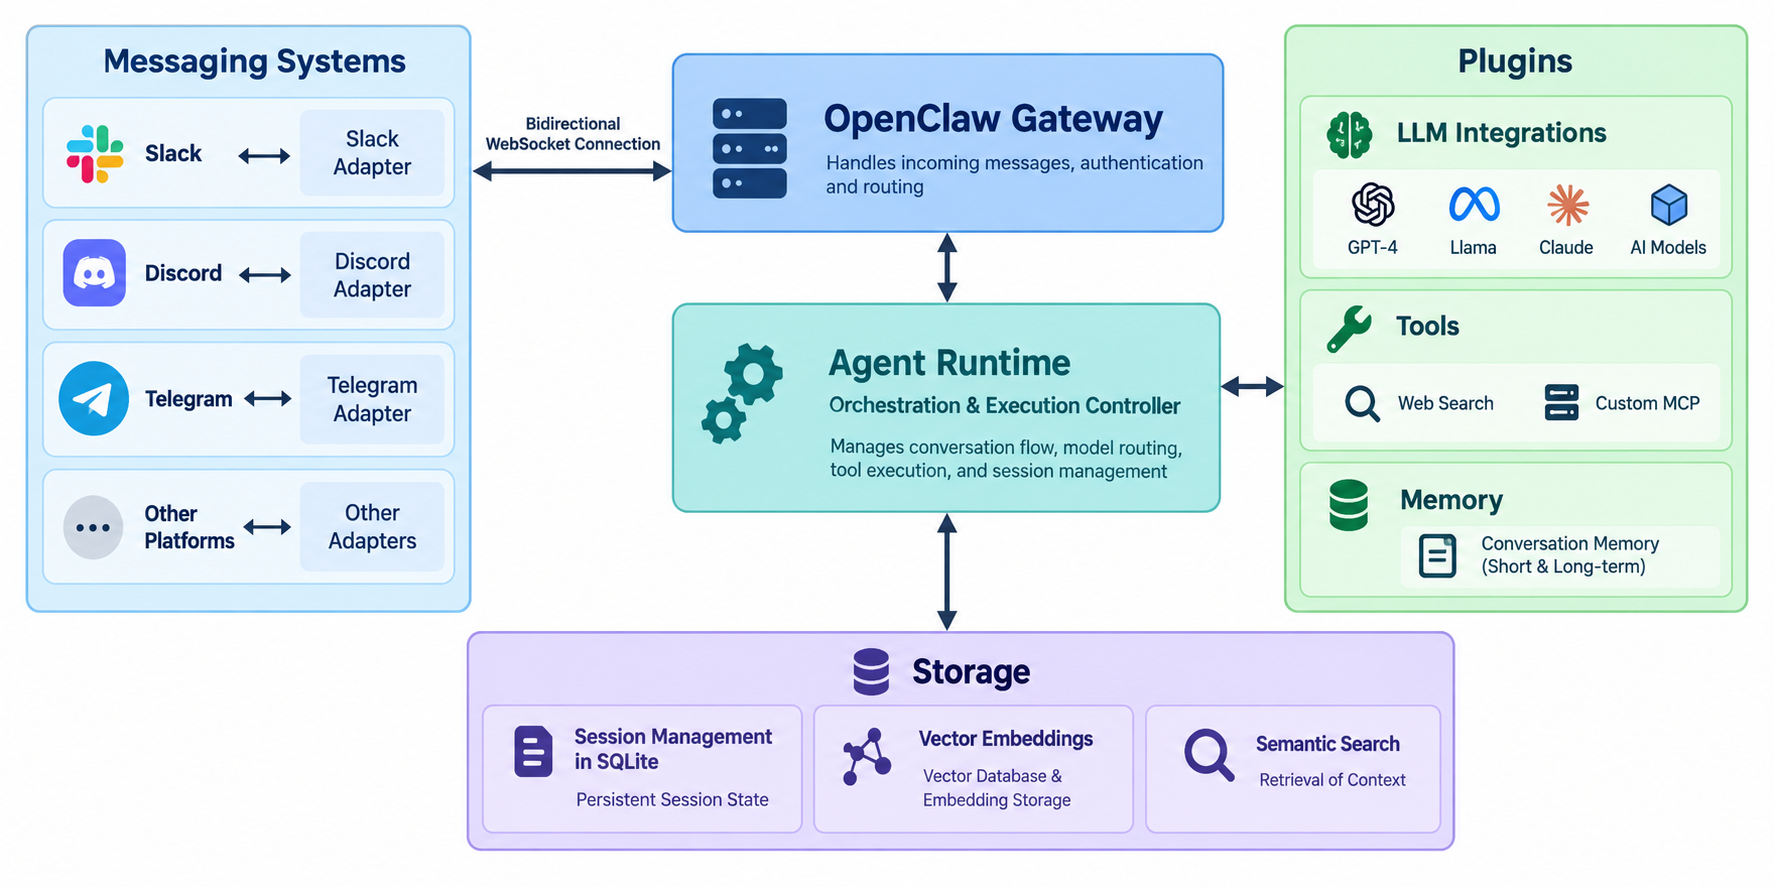
In this post, we will learn about high-level architecture of Openclaw’s Gateway hub-and-spoke architecture, how the device binding handshake workflow works, setting up Openclaw, leveraging Openclaw for different usecases, creating an agentic operating system using OpenClaw agent runtime to manage mutliple agents, context and sessions.
Openclaw Usecases
- Openclaw natively supports agentic browser use. It connects with the browser CDP (chrome devtools protocol) and performs all browser related tasks.
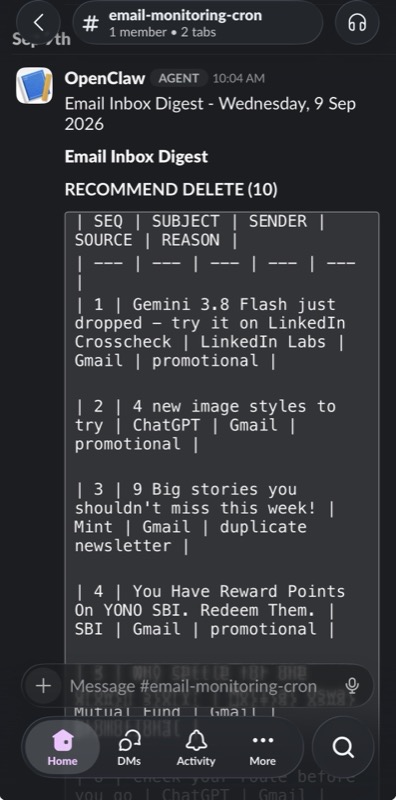
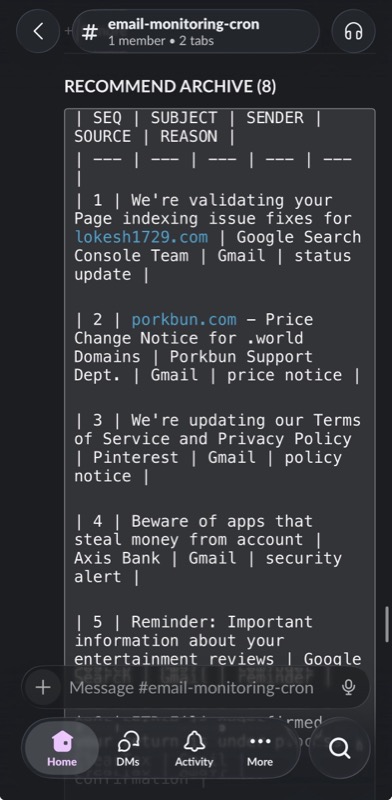
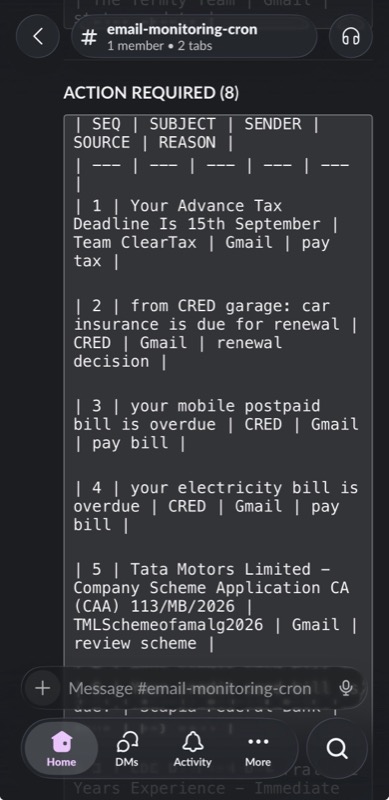
- Openclaw has crons framework built-in where you can create crons to monitor your emails, manage your finances from email alerts, weather reports etc…
- Openclaw handles voice and media natively. It transcribes voice notes, replies with text-to-speech, and can send and receive images, audio, video, and documents, so an agent can work as a voice-first assistant over a normal chat app.
- Openclaw can run fully self-hosted with local models. It supports self-hosted providers like vLLM, SGLang, Ollama, llama.cpp, and LM Studio alongside hosted providers like Anthropic, OpenAI, and Google, so you can keep an agent running entirely on your own hardware.
- Openclaw’s multi-agent routing lets you run several isolated agents — for example, one per workspace, project, or messaging account — from a single Gateway, each with its own persona, model, and session history. Learn more at Agent Runtime section below.
- Openclaw nodes turn a macOS, iOS, or Android device into a controllable spoke. This lets an agent reach device-level capabilities on that node, useful for personal-automation tasks tied to a specific phone or laptop rather than a server.
Email Monitoring with Crons
You can set up OpenClaw to monitor your inbox and alert you on important emails. The agent parses incoming emails, filters based on rules you define, and sends notifications to your preferred messaging channel.
Personal Finance Automation
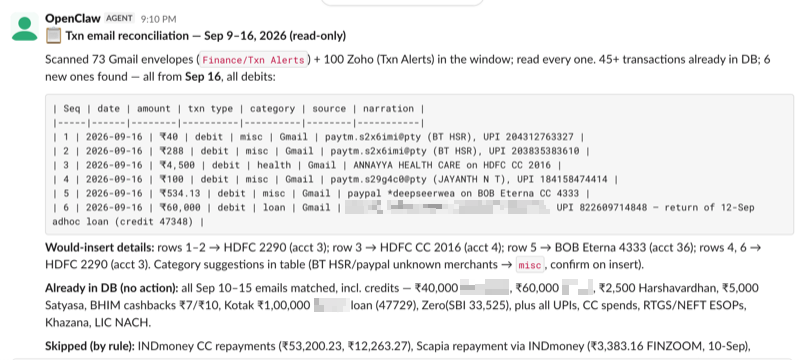
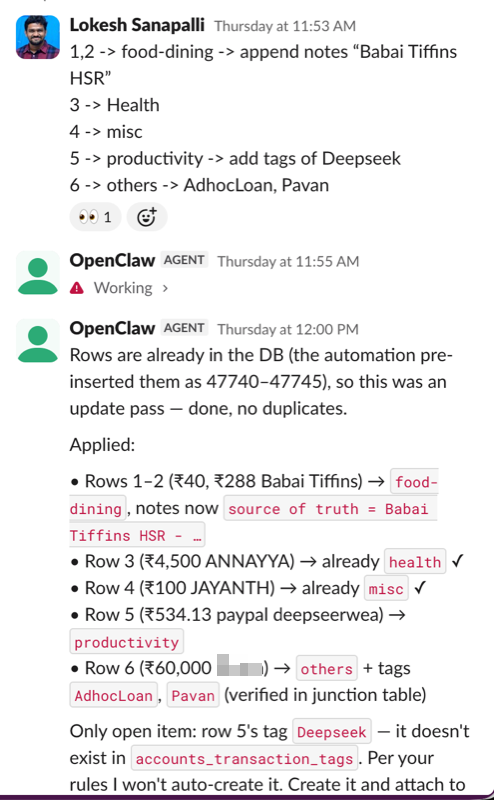
OpenClaw can monitor your financial email alerts (credit card transactions, bank notifications) and track your spending automatically. Set up a cron that parses transaction emails and logs them to a spreadsheet or database.
Weather Monitoring
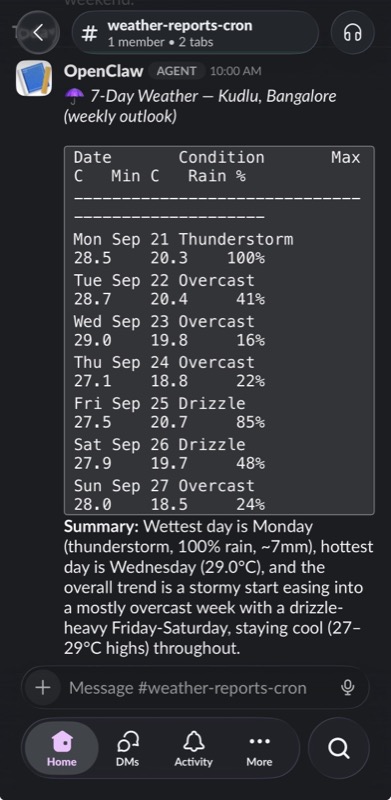
Set up OpenClaw to fetch weather reports on a schedule and send you daily summaries or alerts for specific conditions (rain, extreme temperatures, etc.).
Hub-and-Spoke Architecture
The Gateway is the hub. It is one long-lived process. It owns every messaging surface: WhatsApp, Telegram, Slack, and Discord. It also exposes a typed WebSocket API on 127.0.0.1:18789.
Three kinds of spokes connect to the Gateway:
- Control-plane clients. These are the CLI, the macOS app, the web UI, and automations. They send requests and read events over the WebSocket API.
- Nodes. These run on macOS, iOS, Android, or a headless machine. A node connects over the same WebSocket API. It declares
role: nodeand lists its own capabilities and commands. - Messaging providers. These run inside the Gateway itself. The Gateway opens and keeps these connections. A provider is not a separate spoke process.
The Gateway stores all state in one SQLite database at ~/.openclaw/state/openclaw.sqlite. This database holds paired devices, approved node capabilities, and pending requests.
Every request and event follows one shape. A client sends a request: {type: "req", id, method, params}. The Gateway sends back a response, or it emits an event: {type: "event", event, payload}. This one shape makes the protocol simple to parse and simple to extend.
The WebSockets API
The Gateway WebSocket API follows a typed protocol i.e. every method, every request, and every event has a schema. The Gateway checks each message against that schema before it acts on the message.
The three frame shapes. A client and the Gateway exchange exactly three kinds of frames:
- Request:
{type: "req", id, method, params, traceparent?}. A client sends this to call a method. - Response:
{type: "res", id, ok, payload|error}. The Gateway sends this back. Theidfield matches the request’sid, so a client can match each response to the request that caused it. - Event:
{type: "event", event, payload, seq?, stateVersion?}. The Gateway sends this on its own, without a matching request.seqandstateVersionlet a client detect a missed or out-of-order event.
How an error looks : When ok is false, the error field has this shape: {code, message, details?, retryable?, retryAfterMs?}. A client should read code (and details.code when present) to decide what to do next. The message field is only a human-readable fallback — it can change between versions, so code should not match against it. A common error is a missing scope: {code: "FORBIDDEN", details: {code: "MISSING_SCOPE", missingScope, requiredScopes}}.

Sources: Gateway architecture
Communication with Slack
Openclaw opens HTTP / Websocket connections with the messaging providers depending on the type of integration. In case of Slack, two WebSocket connections would be opened with Slack, one from Gateway and another from user’s client apps. This facilitates full duplex communication between the three parties.
- User to Slack. A user’s own Slack mobile/web app keeps a WebSocket connection open to Slack for real-time messaging. Any communication from user to slack happens via this connection. When the Gateway responds back with a message, the user would get this message via this connection.
- Slack to Gateway. The Gateway opens its own WebSocket connection to Slack. This is the connection the Gateway owns and keeps alive, and it’s how messages sent in Slack reach the Gateway and how the Gateway’s replies get back into the conversation and evenutally reach the user.
The user and the Gateway never talk to each other directly. Slack sits in the middle of both connections, relaying between them.

Device Handshaking: Handshake and Approval Workflow
A client cannot talk to the Gateway the first time it connects. It must pass two checks in order:
- Cryptographic handshake. The client proves it owns a specific keypair.
- Device pairing. The Gateway decides whether to trust that device at all.
Step 1: The Cryptographic Handshake
Identity setup, done once per client:
- The client generates an Ed25519 keypair: a 32-byte private key and a 32-byte public key.
- It derives its device ID from that key:
deviceId = SHA-256(publicKey).hex. The ID is not assigned by the Gateway — it falls out of the key itself. - It stores the keypair locally so it does not have to re-pair on every restart.
The handshake, done on every connect:
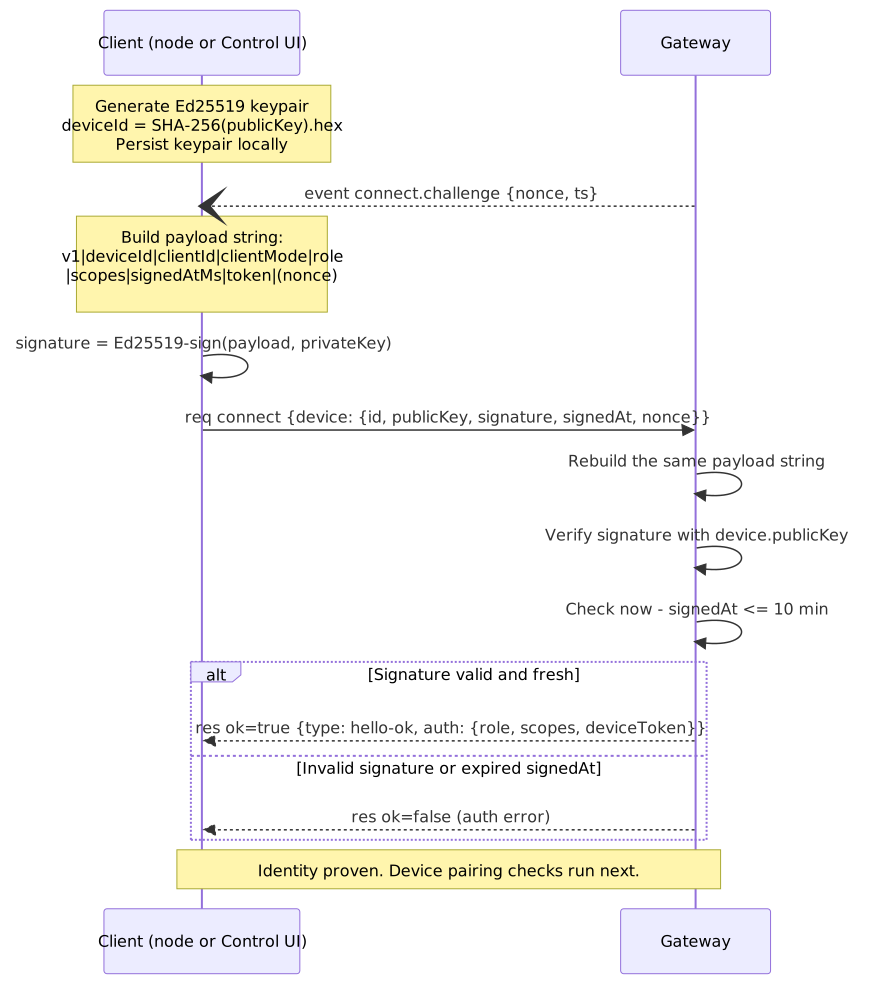
- The Gateway sends an event first:
{"type": "event", "event": "connect.challenge", "nonce": "...", "ts": <timestamp>}. The nonce is a one-time value; the client cannot predict it ahead of time. - The client builds a pipe-delimited payload string:
v1|deviceId|clientId|clientMode|role|scopes|signedAtMs|token. A remote client appends the Gateway’s nonce to this payload. This stops replay attacks such that the previously valid signed request from being replayed later, since the nonce changes on every challenge. The nonce is not required to be appended on loopback clients. - The client signs that payload with its Ed25519 private key and sends
{"type": "req", "method": "connect", "params": {"device": {"id", "publicKey", "signature", "signedAt", "nonce"}}}. Thesignaturekey contains the signed payload. The client also sends the individual field values,id,publicKey,signature,signedAt,nonce, plusclientId,clientMode,role,scopes, andtokenin the request so that the gateway can reconstruct the string and verify the signature. - The Gateway rebuilds the same payload string, verifies the signature against the supplied
publicKey, and checks thatsignedAtis withinDEVICE_SIGNATURE_SKEW_MS(10 minutes) of its own clock. - If the signature is valid and fresh, the Gateway replies
{"type": "res", "ok": true, "payload": {"type": "hello-ok", "auth": {"role", "scopes", "deviceToken"}}}.
This step doesn’t authorise the client to talk to gateway yet. This only establishes the handshaking of node/device with the gateway. The approval process is at the gateway and the admin/operator has to approve from commandline.
Step 2: Device Pairing
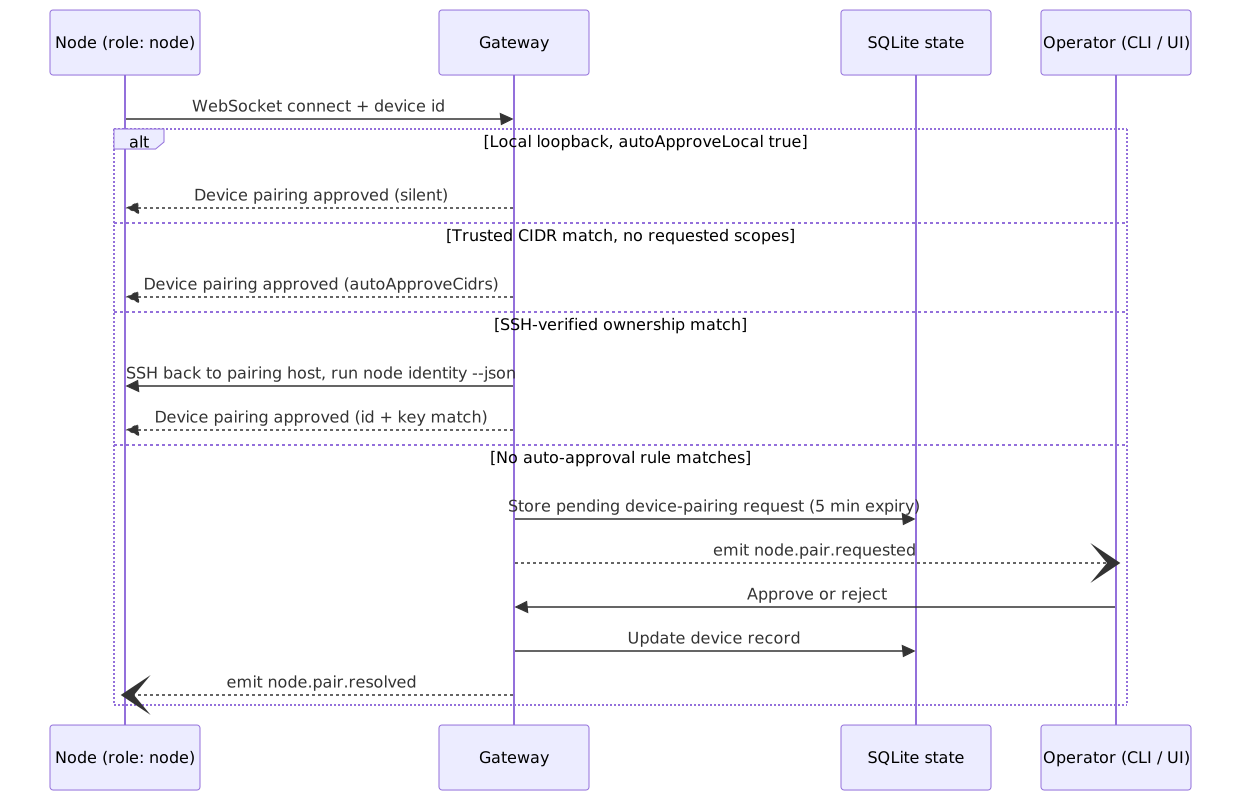
Once identity is proven, a client still is not trusted by default. The pairing to be manually approved by the admin via CLI. The Gateway applies one of four rules, in this order:
- Local silent approval. The connection comes from the same host (loopback). The Gateway approves it without asking, unless the operator sets
gateway.nodes.pairing.autoApproveLocal: false. - Trusted-CIDR approval. The connection comes from an IP address inside a range the operator listed in
autoApproveCidrs. The Gateway approves it, but only when the node requests no extra scopes. - SSH-verified approval. The Gateway connects back to the pairing host over SSH. It runs
openclaw node identity --jsonthere. If the returned device ID and public key match the pending request, the Gateway approves the pairing. This rule applies only to direct private, ULA, link-local, or CGNAT addresses — never to a proxied or loopback address. - Manual approval. No automatic rule matches. The Gateway stores a pending device-pairing request and emits the event
node.pair.requested. An operator, using the CLI or a UI, must approve or reject it. This pending request expires after five minutes if no one acts on it.
When the Gateway approves or rejects a pending request, it emits node.pair.resolved.
The Gateway is the single source of truth for pairing state. The macOS app and any control UI are only front ends: they show pending requests and send the approve or reject decision back to the Gateway.
Agent Runtime
The Gateway does not talk to a LLM model directly. It hands off the message to the Agent Runtime, an embedded process with its own agent loop, tools integration, and prompt assembly. Every agent the runtime manages is a self-contained unit: a workspace directory, a set of bootstrap files, a model choice, and its own session store. Nothing about one agent leaks into another unless the config says so.
Workspace and Bootstrap Files
Each agent gets exactly one workspace directory, and that directory is its cwd. On the first turn, OpenClaw reads a fixed set of files out of that workspace and folds them into the system prompt:
| File | Purpose | How the runtime uses it |
|---|---|---|
AGENTS.md |
Operating instructions and memory | Read once on the first turn of a session and folded into the system prompt’s Project Context; guides how the agent uses its tools; actual tool access is controlled separately by tools.allow/tools.deny |
SOUL.md |
Persona, boundaries, tone | Read once on the first turn; defines the character’s boundaries and tone in Project Context |
IDENTITY.md |
Agent name, vibe, emoji | Read once on the first turn; supplies the name/vibe/emoji half of the persona alongside SOUL.md |
USER.md |
User profile and preferred form of address | Read once on the first turn; personalizes replies to whoever is on the other end |
BOOTSTRAP.md |
One-time initialization ritual | Only created for a new workspace; while present, the runtime adds extra system-prompt guidance for the ritual; the runtime never deletes it for you — remove it yourself once the ritual is done, and it won’t come back on later restarts |
MEMORY.md |
Long-term memory (optional) | Not part of the fixed set — only injected when it exists at the workspace root; the runtime never writes back to it, so anything durable has to be saved there manually |
These files are what keeps each agent distinct from each other. To be honest, we don’t require these many files, it complicates the system. Most of these files are read at the beginning of the session, so editing SOUL.md mid-conversation has no effect until the next session starts.
Configuring One Agent vs. Many
The minimum viable config only needs a workspace:
{
  agents: {
    defaults: {
      workspace: "<path>"
    }
  }
}
To run more than one agent, define named entries under agents.entries instead of relying on defaults. Each entry can override the workspace, the state directory, and the model:
{
  agents: {
    entries: {
      home: {
        default: true,
        workspace: "~/.openclaw/workspace-home",
        model: "anthropic/claude-sonnet-4-6"
      },
      work: {
        workspace: "~/.openclaw/workspace-work",
        model: "anthropic/claude-opus-4-6"
      }
    }
  }
}
workspace holds the bootstrap files above. agentDir (defaults to ~/.openclaw/agents/<agentId>/agent) holds the per-agent SQLite session store and auth profiles, so home and work never share session state even though they run inside the same Gateway process.
Routing Messages to an Agent
With multiple agents defined, something has to decide which agent answers a given message. That’s what bindings are for — they map an inbound message to an agentId using a most-specific-match hierarchy: exact peer, then guild/role, then account, then channel-wide, then the agent marked default.
{
  bindings: [
    { agentId: "work", match: { channel: "whatsapp", accountId: "biz" } },
    { agentId: "home", match: { channel: "whatsapp", accountId: "personal" } }
  ],

  channels: {
    whatsapp: {
      accounts: {
        personal: {},
        biz: {}
      }
    }
  }
}
Here, a WhatsApp message from the biz account always lands with the work agent, and one from personal lands with home — two personas, two model choices, two session stores, sharing one Gateway and one WhatsApp connection.
Per-Agent Tool and Sandbox Restrictions
Because each agent is isolated down to its own tool policy, you can run a trusted agent next to a locked-down one in the same config:
{
  agents: {
    entries: {
      trusted: {
        workspace: "~/.openclaw/workspace-trusted",
        tools: { allow: ["read", "write", "exec"] }
      },
      restricted: {
        workspace: "~/.openclaw/workspace-restricted",
        sandbox: { mode: "all", scope: "agent" },
        tools: { deny: ["write", "exec"] }
      }
    }
  }
}
tools.allow / tools.deny scope which built-in tools an agent can call, and sandbox.mode / sandbox.scope control whether that agent’s tool calls run sandboxed. Cross-agent access is off by default too — tools.agentToAgent has to explicitly allow a pair of agents to talk to each other, otherwise restricted has no path into trusted’s session or workspace.
Sources: Agent runtime, Multi-agent routing
Using OpenClaw with Coding Harnesses
OpenClaw’s Agent Runtime can be paired with existing coding agents and development tools. You might already use tools like OpenAI Codex CLI, Claude Code CLI, or Cursor directly in your terminal or IDE. OpenClaw doesn’t replace these. It becomes the session and routing layer that lets you run all of them from one place, with one source of truth for context.
How It Works
OpenClaw supports two integration patterns for coding harnesses:
-
WebSocket/ACP integration. The coding harness connects to OpenClaw’s Gateway over WebSocket, authenticates via the Ed25519 handshake, and sends requests to OpenClaw. OpenClaw routes to the configured agent. This is how OpenCode integrates.
-
Tool-based integration. OpenClaw calls the coding harness’s CLI as a tool. You configure OpenClaw with an
exectool that runscodexorclaudecommands. OpenClaw shells out to the CLI, passes context, and returns the response. This is how you’d integrate Codex CLI and Claude Code CLI, since they don’t provide API keys - you use them via their CLIs.
Which pattern you use depends on what the harness supports. OpenCode has native WebSocket support. Codex CLI and Claude Code CLI are invoked as shell commands.
Quick Comparison
| Harness | Integration Method | Built-in OpenClaw Support | What You Gain |
|---|---|---|---|
| OpenCode CLI | WebSocket. OpenCode connects to the Gateway, authenticates via Ed25519 handshake, and routes requests through OpenClaw. | Yes. Native integration. Configure ~/.config/opencode/opencode.json with Gateway URL and device credentials. |
Unified session state across terminal, Slack, Telegram. Multi-agent routing. Tool policies per workspace. |
| OpenAI Codex CLI / Claude Code CLI | Tool/CLI. OpenClaw runs codex or claude as an exec tool. Pass prompts, get responses. No API key needed - subscription auth is handled by the CLI. |
No. Requires exec tool config to shell out to the CLI. |
Use Codex or Claude’s code generation through OpenClaw’s routing, with subscription auth handled by their CLIs. |
| Cursor IDE | Tool/CLI. OpenClaw can invoke Cursor’s agent capabilities via its CLI (cursor command) as an exec tool, similar to Codex and Claude Code. Subscription auth is handled by Cursor. |
No. Requires exec tool config to shell out to Cursor CLI. |
Use Cursor’s code generation from OpenClaw, with subscription auth handled by Cursor. |
Example: OpenCode + OpenClaw
If you use OpenCode as your primary coding assistant, you can route it through OpenClaw like this:
- Configure OpenClaw with an agent entry for coding:
{
  agents: {
    entries: {
      coding: {
        workspace: "~/.openclaw/workspace-coding",
        model: "anthropic/claude-sonnet-4-6",
        tools: { allow: ["read", "write", "exec"] }
      }
    }
  }
}- Configure OpenCode to use OpenClaw. In
~/.config/opencode/opencode.json:
{
  provider: "openclaw",
  endpoint: "ws://127.0.0.1:18789",
  agentId: "coding"
}- Start OpenCode. It connects to the Gateway, authenticates, and routes all requests to the
codingagent. The agent’s session state stays in~/.openclaw/agents/coding/agent.
The same agent can also answer messages from Slack or Telegram if you bind those surfaces to the coding agent. One agent, multiple surfaces, consistent context.
Example: Codex CLI / Claude Code CLI + OpenClaw
If you have a Codex or Claude Code subscription and use their CLI, you can still route through OpenClaw by calling the CLI as a tool:
- Install the CLI and authenticate:
# For Claude Code
npm install -g @anthropic-ai/claude-code
claude auth login

# For Codex
npm install -g @openai/codex
codex auth login- Configure OpenClaw with an
exectool that calls the CLI:
{
  agents: {
    entries: {
      coding: {
        workspace: "~/.openclaw/workspace-coding",
        model: "anthropic/claude-sonnet-4-6", // or your preferred model
        tools: {
          allow: ["read", "write", "exec"]
        },
        exec: {
          commands: {
            codex: "codex",
            claude: "claude"
          }
        }
      }
    }
  }
}- In your agent’s workspace, add instructions in
AGENTS.mdfor when to use each tool:
## Coding Tools

- Use the `claude` command for code generation and refactoring.
- Use the `codex` command for OpenAI-specific tasks.
- Pass the user's request as the prompt to the CLI.
Now when you ask OpenClaw to write code, it can shell out to Codex or Claude Code CLI, and you get subscription-based auth plus OpenClaw’s session storage and multi-channel routing.
Building Custom Agent OS Applications
OpenClaw is designed to be more than an assistant you talk to. It’s a foundation for building your own Agent Operating System: a custom application with specialized agents for marketing, sales, customer support, internal tools, or any domain where you want multiple agents, each with its own persona, tools, and context.
The Architecture
A custom Agent OS built on OpenClaw looks like this:

Frontend (your custom UI). A web or mobile app with a chat interface, dashboards, and domain-specific controls. The UI talks to your backend server, not directly to OpenClaw.
Backend server (your app server). Your server handles user authentication, session management, and business logic. It connects to the OpenClaw Gateway over the WebSocket API and authenticates via the same cryptographic handshake any control-plane client uses.
OpenClaw Gateway. The Gateway handles all agent runtime concerns: model calls, tool execution, session storage, and multi-agent routing. Your backend hands off messages to the Gateway and receives responses.
Specialized agents. Each agent has its own workspace, bootstrap files, model choice, and tool policy. You define these in the OpenClaw config, and your backend routes user requests to the right agent based on your application’s logic.
How Auth Works
Your backend server authenticates with the OpenClaw Gateway using the same Ed25519 handshake described earlier. Here’s how it fits together:
- User logs in to your app. Your frontend authenticates the user with your backend (OAuth, email/password, SSO, whatever you use).
- Backend authenticates with Gateway. Your backend generates an Ed25519 keypair, stores it, and uses it to complete the cryptographic handshake with the Gateway. The device ID is derived from the public key, and the pairing is approved by the admin (or auto-approved if your backend runs on the same host).
- Backend opens a WebSocket connection. Once paired, your backend keeps a WebSocket connection open to the Gateway at
ws://<gateway-host>:18789. - User sends a message. The frontend sends the message to your backend over HTTPS.
- Backend routes to Gateway. Your backend sends a
reqframe to the Gateway, specifying which agent should handle the request. - Gateway processes and responds. The Gateway runs the agent loop, calls the model, executes any tools, and sends back a
resframe with the response. - Backend returns response to frontend. Your backend signs the response and sends it back to the user’s browser or mobile app.
This layered approach keeps user auth in your backend, and agent auth between your backend and the Gateway. The Gateway never sees your users’ credentials.
Example: Multi-Agent Business OS
Say you want to build an internal tool with three agents:
| Agent | Purpose | Tools | Model |
|---|---|---|---|
| Marketing | Drafts blog posts, social media copy, and campaign emails | read, write, web_search |
anthropic/claude-sonnet-4-6 |
| Sales | Answers prospect questions, drafts proposals, logs CRM updates | read, write, exec (for CRM CLI) |
anthropic/claude-sonnet-4-6 |
| Support | Answers customer questions, looks up orders, creates tickets | read, exec (for ticketing API) |
anthropic/claude-sonnet-4-6 |
Your OpenClaw config might look like:
{
  agents: {
    entries: {
      marketing: {
        workspace: "/opt/agent-os/workspaces/marketing",
        model: "anthropic/claude-sonnet-4-6",
        tools: { allow: ["read", "write", "web_search"] }
      },
      sales: {
        workspace: "/opt/agent-os/workspaces/sales",
        model: "anthropic/claude-sonnet-4-6",
        tools: { allow: ["read", "write", "exec"] }
      },
      support: {
        workspace: "/opt/agent-os/workspaces/support",
        model: "anthropic/claude-sonnet-4-6",
        tools: { allow: ["read", "exec"] }
      }
    }
  }
}
Your backend routes incoming messages based on the user’s selection in the UI. If the user selects “Marketing” from a dropdown, your backend sends the message to the Gateway with agentId: "marketing".
Where to Run Your Backend
Your backend server can run:
- On the same host as the Gateway. Simplest setup. Loopback auto-approval handles pairing. No network eavesdropping risk between backend and Gateway.
- In the same private network. Your backend connects to the Gateway over a private IP or VPN. Use the Trusted-CIDR auto-approval rule to skip manual pairing.
- On a public server. Your backend connects to the Gateway over the public internet. Use WSS (TLS) and go through manual pairing approval, or set up SSH-verified approval if the Gateway can reach your backend’s host.
Scaling Considerations
OpenClaw’s Gateway is a single process. If you need to scale:
- Horizontal scaling: Run multiple Gateway instances behind a load balancer. Each Gateway stores state in its own SQLite database, so you need sticky sessions or a shared session store.
- Agent isolation: Each agent runs in the same process as its Gateway. CPU-bound work (model inference if using a local model) can bottleneck the Gateway. Offload to a separate model server if needed.
- Connection pooling: Each control-plane client keeps one WebSocket open. If you have many backend instances, each opens its own connection to the Gateway.
Sources: Gateway security, Multi-agent routing
FAQs
where can I host Openclaw?
- You can buy a VPS from hetzner, OVH cloud, hostinzer, netcup etc… and setup there
- Additionally, you can email me at hi@lokesh1729.com for setting up your personal OpenClaw. I am currently providing hosting service for Openclaw at $20 per month when paid monthly / $15 per month when paid yearly. You get a raw VPS with root shell access which you can control, Openclaw gateway UI, Openclaw browser control, SSL/TLS, free monitoring, backups.
What messaging services does Openclaw support?
A lot of them. Telegram, Slack, Discord, WhatsApp, Signal, iMessage, Microsoft Teams, Google Chat, Matrix, Mattermost, IRC, LINE, Nextcloud Talk, Nostr, QQ Bot, Raft, SMS, Synology Chat, Tlon, Twitch, Voice Call, Feishu, Zalo, and Zalo Personal, and there are external plugins for a few more like WeChat and Yuanbao. Group chats work with mention-based activation, and DMs are protected by the allowlists.
Does Openclaw has it’s own LLMs or I need provide my API key?
Openclaw doesn’t have its own model — it’s a runtime that calls whichever model you point it at. For a hosted provider you bring your own API key, or authenticate via subscription OAuth where that’s supported. If you’d rather not send anything to a hosted provider at all, you can point Openclaw at a local model instead, and no API key is needed.
What AI providers does Openclaw support?
The usual hosted providers — Anthropic, OpenAI, Google, Opencode and others — plus self-hosted/local runtimes: vLLM, SGLang, Ollama, llama.cpp, and LM Studio that lets you run an agent entirely on your own hardware, as mentioned in the use cases above.
What AI models does Openclaw support?
Any model your configured provider exposes. A model reference in config is just provider/model (for example anthropic/claude-sonnet-4-6 or openai/gpt-4o), and you need to provide the provider’s API key, add the model name. That’s all! Additionally, openclaw supports fallback chain i.e. if a model fails or rate limited, it fallback to another model. Refer Configuring model fallbacks section.
How do I create multiple agents with different prompts?
Each agent gets its own workspace directory. Inside that workspace, you place bootstrap files like AGENTS.md, SOUL.md, IDENTITY.md, and USER.md. These files define the agent’s behavior, persona, and context. Define multiple agents in your config under agents.entries, each pointing to its own workspace with its own set of bootstrap files. See the Agent Runtime section for details on workspace structure and the Multi-Agent Business OS example for a concrete config.
Can each agent use a different model?
Yes. Each agent entry in the config can specify its own model field. For example, you could have a coding agent running on anthropic/claude-sonnet-4-6 for reasoning-heavy tasks, and a quick-response agent running on openai/gpt-4o-mini for simple queries. Each agent also gets its own session store, so conversations stay isolated.
How do I set up an agent for a specific use case like email monitoring?
Create a workspace with instructions in AGENTS.md that describe the task. For email monitoring, you might write: “You monitor the user’s inbox. When new emails arrive, summarize them and flag anything urgent. Respond in bullet points.” Then create a cron job in OpenClaw that triggers this agent on a schedule. The agent reads the email content and follows the instructions you wrote. See the Email Monitoring with Crons example above.
How do agents stay isolated from each other?
Each agent has its own workspace directory, its own session database in ~/.openclaw/agents/<agentId>/agent, and its own tool policy defined by tools.allow and tools.deny. By default, agents cannot access each other’s sessions or files. If you want two agents to communicate, you have to explicitly enable tools.agentToAgent in the config.
Can I share context between agents?
Not by default. Each agent maintains its own session and memory. If you need shared context, you have two options: (1) store shared state in a file both agents can read via the read tool, or (2) enable cross-agent communication via tools.agentToAgent and have one agent call the other as a tool.